Toyota LC70 'Grazy Janey'

Hier kun je de bouwverslagen plaatsen van je wagen.
Gebruikersavatar
Wouterb
Donateur
Berichten: 1217
Lid geworden op: 02 jun 2017 09:24
Locatie: Medemblik
Participant x 16
Gegeven waarderingen: 92 keren
Ontvangen waarderingen: 136 keren

Re: Toyota LC70 'Grazy Janey'

Bericht door Wouterb » 02 jan 2019 17:18

Fiddled around with the steering link to get it as aligned as possible to the panhard bar. Updated the printed axle brace in the process.
18.jpg
19.jpg
The mounting of the remaining upper link is been altered aswell. By bending it upwards at both ends I created a lot more space atop the suspension to house the motor and transmission.
20.jpg
I think the position of motor/transmission and servo is more or less set by now. Physically mounting the body should resolve that.
20.jpg
22.jpg
Here’s the chassis completely bottomed out. (no shocks). Aiming for a low COG.
.
23.jpg


Alternatively I could go for splitting the transmission and motor-spur combination. Mounting motor and spur upfront and the transmission flat on the skid.
That will require a new motor and ‘topshaft’ mount.
A bit like this:
24.jpg
(http://www.rccrawler.com/forum/gener...tor-mount.html)

[youtube][/youtube]
Bijlagen
21.jpg
'Crazy Janey' (zelfbouw chassis, lc70 hardbody)
Baja Cherokee (zelfbouw, Jeep Cherokee hardbody)
Ramrod (VS4-10, kit)
Rip-Off (zelfbouw chassis, Toyota SR5 lexan)

Gebruikersavatar
Wouterb
Donateur
Berichten: 1217
Lid geworden op: 02 jun 2017 09:24
Locatie: Medemblik
Participant x 16
Gegeven waarderingen: 92 keren
Ontvangen waarderingen: 136 keren

Re: Toyota LC70 'Grazy Janey'

Bericht door Wouterb » 02 jan 2019 17:27

It’s alive!! (More or less)
Started fitting and shifting parts again.
Now that the body is here I can see where to fit the parts exactly.
I screwed the main body parts together to see the space underneath.
24-1.jpg
The (again altered) motor position seems okay. Neatly under de bonnet. Placed on a scrap piece of aluminium and bent to hold it in position.
25.jpg
I did, as it turns out, underestimated the space needed for a good placement of both servos. Servo arm for steering requires a lot of room.
26.jpg
Eventually I had to lay down the steering servo. In any other position the arm hit either the chassis or panhard. The winch will fit between the rails. (White brace is temporary). I plan on making the winch drum visible from the topside of the bumper.
The 2 (black) screws are there to keep the body leveled during fitting.
27.jpg
28.jpg
Elk nadeel heb ze voordeel! (Famous exclamation of Johan Cruijf, Dutch soccer player, -trainer, and -annalist) meaning: every disadvantage has its benefits.
Benefits of the uneconomically flat position of the servos leaves a nice open space under the bonnet. Battery compartment?
I do have to look for shorter shocks or shorten the AX10 leftovers. Around 80mm (3.5”)
Ik moet nog wel even opzoek naar kortere schokdempers, rond de 80mm. Misschien dat ik met (ingekorte) SCX10 shocks wegkom.

Just printed a mount/brace for the steering servo. (It got a bit late so no pictures yet, sorry)

T-case is on its way from china, hence the loose drive shafts.

Short term to do list:
- Built new links
- Internals of the axles (beeftubes, shorten axle shafts)
- Rework rear suspension
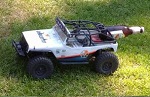
This is where it sits right now. Not the fastest built ever. Enjoying every minute of it though.
I don’t claim to be ‘on par’ with most builds on this site but I hope to finish it as a capable and (reasonably) good looking rig.

There are a couple of dilemmas I’m facing right now, I hope some of you can help me with these.

Mainly it concerns in which order the tackle the different issues.

At the moment I’m placing each item needed for a rolling chassis in such a way to avoid clearance issues later on. Is this wise, or should I mount the body first to get the main measurements fixed and attend clearance issue later (altering the just built rolling chassis)?

Further I’d like to make a hinge type mount with a hinge at the back and a locking mechanism behind the grill. (Leaving the bumper, sidesteps, bull- and bush bars on the chassis).
Since this is my first hard body built (first built other than kit versions that is). Will it be strong enough to secure the hinge part with 2 or 4 bolts in the bed floor?

Do I need to reinforce the body front to back or will the 4 screws that connect the cab to the bed be sufficient?
Rock sliders (beefed up sidesteps) will be mounted to the chassis, Not to the body.

thnx in advance.
more updates soon.
'Crazy Janey' (zelfbouw chassis, lc70 hardbody)
Baja Cherokee (zelfbouw, Jeep Cherokee hardbody)
Ramrod (VS4-10, kit)
Rip-Off (zelfbouw chassis, Toyota SR5 lexan)

Gebruikersavatar
Wouterb
Donateur
Berichten: 1217
Lid geworden op: 02 jun 2017 09:24
Locatie: Medemblik
Participant x 16
Gegeven waarderingen: 92 keren
Ontvangen waarderingen: 136 keren

Re: Toyota LC70 'Grazy Janey'

Bericht door Wouterb » 02 jan 2019 17:48

Just pulled some pics of my phone.
After this I'm up to date with the build:

So the transfer case arrived. In the previous skid plate I didn’t include any mounting holes or tabs. Assuming adjustments would be needed anyway. Apart from adding the mounting holes for the transfer I also places the lower link mounts more to the outside.
30.jpg
Fitting the transfer case was a breeze with the new skid. (Made new links to replace the sloppy AX10 ones)
31.jpg
I think a nearly full interior should be possible. The shaft between transmission and t-case is a shortened Axial one looks like I need to tilt the motor /transmission a bit backward to reduce the angles on the joints.
32.jpg
I started pre-fabbing a bumper. I unfolded a 3D model of it and printed it (old fashioned ) on paper.
33.jpg
Placed it on a sheet of 1mm aluminium an traced it with a hobby knife.
34.jpg
Then, bending it 2 or 3 times, it cracks and you can fold it back to 3D.
35.jpg
Mocking up for fitment. Edges near the wheel wells need trimming to clear properly. Wells themself as well I’m afraid. At least I can see whether the winch will fit and how to mount it.
36.jpg
anyone knows how to use welder?
'Crazy Janey' (zelfbouw chassis, lc70 hardbody)
Baja Cherokee (zelfbouw, Jeep Cherokee hardbody)
Ramrod (VS4-10, kit)
Rip-Off (zelfbouw chassis, Toyota SR5 lexan)

Gebruikersavatar
Wouterb
Donateur
Berichten: 1217
Lid geworden op: 02 jun 2017 09:24
Locatie: Medemblik
Participant x 16
Gegeven waarderingen: 92 keren
Ontvangen waarderingen: 136 keren

Re: Toyota LC70 'Grazy Janey'

Bericht door Wouterb » 02 jan 2019 17:55

37.jpg
38.jpg
The hacked up Wraithaxles are being tubed.
39.jpg
Securing all pieces.
40.jpg
Axle shafts; cut, shortened and welded back together.
41.jpg

Quick check of the existing bearings….and replaced them all.
42.jpg
Made an elegant motormount, if I may say so. Looks to do the trick.
43.jpg
44.jpg
Rubberband-mounting-metthod for all electronics. Commencing testdrive #1
45.jpg
46.jpg
'Crazy Janey' (zelfbouw chassis, lc70 hardbody)
Baja Cherokee (zelfbouw, Jeep Cherokee hardbody)
Ramrod (VS4-10, kit)
Rip-Off (zelfbouw chassis, Toyota SR5 lexan)

Gebruikersavatar
Wouterb
Donateur
Berichten: 1217
Lid geworden op: 02 jun 2017 09:24
Locatie: Medemblik
Participant x 16
Gegeven waarderingen: 92 keren
Ontvangen waarderingen: 136 keren

Re: Toyota LC70 'Grazy Janey'

Bericht door Wouterb » 02 jan 2019 17:59

47.jpg
The bumper has been welded. According to the welder: “it worked out, but it’s the last in the series!” 0.5mm seems to be tricky to weld. (1/32”)
48.jpg
After a lot of test fitting and 3 prototypes I decided on an aluminium bracket to reinforce the printed bumper mounts, which turned out to be a bit flimsy. This created a nice spot to mount the servo winch and mounting location for D-shackles on the front in the process.
49.jpg
The standard supplied bumper had to go. Too bad it had the light housing attached.
Let’s separate the 2… quite a moment to take the plunge and put the saw to a new body for the first time.
50.jpg
Testfit.
I can live with this.
51.jpg

Now for the mounting of the body; I do have an issue, or dilemma you might say.

Option 1: Body in one piece
52.jpg
Option 2: Body separated
53.jpg
Choices… choices..

The plan is to place the battery in backrest of the front seat. The rear of that cab is open so the area is fully accessible (If option 2 is applied)

Advantages option 2 (over option 1):
- I can mount the cab part semi-permanent. I don’t need access there that often.
- Wiring of the (front) lights doesn’t need to go all the way to the back past the hinge area.
- Hinge and locking mechanism take less stress (in case of rollovers etc)
- Cage mounting frame under the bed can be used for the locking mechanism.

It also has its downsides:
- Keeping it in one piece makes it all a bit more simple
- Having to hack into a perfectly good body (bumper aside)
- Styrene work of a constructive nature are required (might sound silly, but I’m an amateur in that area )
- Risk of body part misaligned during construction and/or over time

I’m leaning towards option 2. Can someone point out any examples of the split option and its mounting? Especially to keep the parts aligned. Input is welcomed.
'Crazy Janey' (zelfbouw chassis, lc70 hardbody)
Baja Cherokee (zelfbouw, Jeep Cherokee hardbody)
Ramrod (VS4-10, kit)
Rip-Off (zelfbouw chassis, Toyota SR5 lexan)

Gebruikersavatar
Wouterb
Donateur
Berichten: 1217
Lid geworden op: 02 jun 2017 09:24
Locatie: Medemblik
Participant x 16
Gegeven waarderingen: 92 keren
Ontvangen waarderingen: 136 keren

Re: Toyota LC70 'Grazy Janey'

Bericht door Wouterb » 02 jan 2019 18:14

Finally I have some progress to report.
First I tidied up the suspension. Front and rear.
Front was easy enough. Sort out the right length to fit the desired travel.
54.jpg
In the rear I had to fiddle a bit with the links to leave a bit of space for the 3dprinted cantilever setup.
55.jpg
Also I upgraded hinge in the back.
When the body comes down it kind of locks into place.
56.jpg
Then | thought it was time to enter the brazing game. I wanted bull-and bushbars from the get go. And the attached rock sliders would give me the basis of a floor.
57.jpg
58.jpg
Bullbar setup. Bending the brass didn’t went all that smooth so a ‘used look’ was inevitable.
59.jpg
60.jpg
61.jpg
Then, conecting the dots: bushbars between sliders and bullbar.
62.jpg
63.jpg
64.jpg
3d printed light bucket seems to fit without issues. Bonus!
66.jpg
Next up: Electronics! Let’s get this thing running.
Bijlagen
65.jpg
'Crazy Janey' (zelfbouw chassis, lc70 hardbody)
Baja Cherokee (zelfbouw, Jeep Cherokee hardbody)
Ramrod (VS4-10, kit)
Rip-Off (zelfbouw chassis, Toyota SR5 lexan)

Gebruikersavatar
Wouterb
Donateur
Berichten: 1217
Lid geworden op: 02 jun 2017 09:24
Locatie: Medemblik
Participant x 16
Gegeven waarderingen: 92 keren
Ontvangen waarderingen: 136 keren

Re: Toyota LC70 'Grazy Janey'

Bericht door Wouterb » 02 jan 2019 18:23

Floor is in.
67.jpg
Also made an electronics tray. Fits right under the dash.


First testrun verdict: passed.
68.jpg
69.jpg
Still a lot to do though


Next: Paint.

Ready for the plunge:
70.jpg
No way back
71.jpg


Got a little chill outside. Second layer applied indoors.
72.jpg
Grill must be black
73.jpg


24h bleach bath. Don’t try to rush it with an exacto knife…
74.jpg
Bumper and bullbar got an upgrade as well.
Testfit
75.jpg
Body at 80% finished. Bed needs work still.
76.jpg
.

The look I was aiming for…
77.jpg
78.jpg
Not done yet (duh!), more to come. Thnx for reading
Next up: lights.
'Crazy Janey' (zelfbouw chassis, lc70 hardbody)
Baja Cherokee (zelfbouw, Jeep Cherokee hardbody)
Ramrod (VS4-10, kit)
Rip-Off (zelfbouw chassis, Toyota SR5 lexan)

Gebruikersavatar
Wouterb
Donateur
Berichten: 1217
Lid geworden op: 02 jun 2017 09:24
Locatie: Medemblik
Participant x 16
Gegeven waarderingen: 92 keren
Ontvangen waarderingen: 136 keren

Re: Toyota LC70 'Grazy Janey'

Bericht door Wouterb » 02 jan 2019 18:30

Ever returning issue here is that the wires from the light have to cross from the body to the chassis. Which hinders separating the two.
Also in my case, I’ll have to raise the body to replace the battery.
That calls for a flipping mechanism that allows the body to click into an open position without having to remove the body and disconnect the lights.

Took some time and a few prototypes but… tadaah!!

79.jpg
3d printed frame on aluminium linkage in laid down position.

80.jpg
Partly opened.

81.jpg
When the linkage is pushed through its dead point it kinks back and rests on the existing chassis brace.

82.jpg
In this ‘locked’ position the body rests in an upright position against the flip-frame. Body hinges on the aft brass covered bolts with a V-shaped bracket attached to the body.

83.jpg
The body is not attached in any way to the flip-frame, making it very easy to remove the body

Now with this item solved I return to the original challenge: Lights!

Well, it proved not to be as difficult as I was afraid of. After determining the right resistor values to get the right brightness I decided on two circuits.
84.jpg
1 for the ‘on’ status; the blinkers are turned on when the ESC is switched on.
85.jpg
86.jpg
Second circuit operated by the 4th channel switch.
87.jpg
I even got the fender blinkers to light up.

88.jpg
Single plug to electrically detach the body from the chassis. 3 wires do the trick: yellow and red act as + for each circuit and a combined ground wire (brown)

Previously I used the electronics from busted (toothless) servos to act as switch. But somehow in this car they get hot, and fry in no time. No matter what the LED load is. Even the one that has served in my SXC10 G6 jeep with not a single issue in a year.

Back to the drawing board for a more sturdy solution to convert a PWM signal to a 0-6v output….
Ideas anyone?
Bijlagen
88.jpg
'Crazy Janey' (zelfbouw chassis, lc70 hardbody)
Baja Cherokee (zelfbouw, Jeep Cherokee hardbody)
Ramrod (VS4-10, kit)
Rip-Off (zelfbouw chassis, Toyota SR5 lexan)

Gebruikersavatar
Wouterb
Donateur
Berichten: 1217
Lid geworden op: 02 jun 2017 09:24
Locatie: Medemblik
Participant x 16
Gegeven waarderingen: 92 keren
Ontvangen waarderingen: 136 keren

Re: Toyota LC70 'Grazy Janey'

Bericht door Wouterb » 02 jan 2019 18:39

Did find a solution to the light switching problem: I placed a $3-10A-china-brew-ESC in the circuit. Works like a charm. I used a similar unit to control the servo winch by the way.
While working on the lights I feld the need to incorporate the dashboard. I soon found that the dash decals are semi transparant. This meant I can use them to create a backlit dashboard.
89.jpg
90.jpg
Painted up the rest of the standard dash (okay, I added printed vent grills)
91.jpg
92.jpg
93.jpg
94.jpg
Me like!
95.jpg
96.jpg
In the proces I added door panels

Then the cavas tent on the back.
99.jpg
Made a template for the layout to fixate the hoops in place and so braze them in a fixed position.
100.jpg
101.jpg
Added angled brass (0.5x0.5”) to fit it on the bed.
102.jpg
A little touch of black paint…

…and got behind the sewing machine to make a canvas.
103.jpg
104.jpg
105.jpg
Panels can be opened or closed individually.
106.jpg
107.jpg
I’ve taken her for first true trail ride as she sits
108.jpg
109.jpg
110.jpg
Time to start the interior.
'Crazy Janey' (zelfbouw chassis, lc70 hardbody)
Baja Cherokee (zelfbouw, Jeep Cherokee hardbody)
Ramrod (VS4-10, kit)
Rip-Off (zelfbouw chassis, Toyota SR5 lexan)

Subonno
Donateur
Berichten: 516
Lid geworden op: 03 dec 2018 23:54
Locatie: Hilversum
Participant x 7
Gegeven waarderingen: 148 keren
Ontvangen waarderingen: 19 keren

Re: Toyota LC70 'Grazy Janey'

Bericht door Subonno » 02 jan 2019 18:58

Mooie wagen, wat een detail!

Wie is er online

Gebruikers op dit forum: Geen geregistreerde gebruikers en 73 gasten